This post explains how to install and configure FreeNAS (Free Network attached Storage) Server. It is a very useful tool for sharing unix,apple and windows shares over networks. And it is very easy to install and configure too.
FreeNAS is a FreeBSD based os used for sharing storages over the network. The version we are using is 8.0. Which is based on FreeBSD 8.0
Installation:
Normally we install FreeNAS into a usb device which has size of less than 2Gb. Because if u install FreeNAS in a partition of 10gb,all those 10gb cannot be used for anythig else. So always install FreeNAS in a usb drive or a partition of less than 2Gb.
Here for testing we will install FreeNAS in a vmware instance. The specifications are given below. You will need a dhcp server installed in your network.
FreeNAS1:
RAM - 1024M
Processor - Intel(R) Core(TM)2 Duo CPU T6400 @2.00GHz
Hard Disk (IDE) - 2gb
Hard Disk (IDE) - 10gb
Hard Disk (IDE) - 12gb
cdrom - FreeNAS-8.0-RELEASE-i386.iso
Network adaptor-1 - (bridged)
Network adaptor-2 - (Host Only)
Display - Auto detect


Select 1. or wait for the default one to proceed automatically or select from menu for others.
Step 2:
 Select 1 and press ok to install.
Step 3:


 Press ok to continue.
 Step 7:

 Press F1 or wait for the default one to proceed.
Step 9:
You will be prompted again. This time for select the boot menu.
 Step 10:
FreeNAS is success fully booted. The IP addresses for the Web interface will be listed.

Step 11:
Access the web interface from your favorite browser.
 Step 12:
Give the credentials

Step 14:
Now we will create storage volumes which we will use for sharing.
 Select storage. You can see no volumes are defined.
Step 15:
 Click on create volumes(in black box). Now a small window will pop up showing the disks in your system. We have ada1 of 10G and ada2 of 12G.
Step16:
 Now we'll create a volume named data1 on our 10Gb ada1 disk. You can either use UFS or ZFS. ZFS needs more RAM. It has more functions also. Now click on add volume.
Step 17:
 Now you can see volume data1 is create with path /mnt/data1. You will lose some space for writing headers.
Step 18:
 We will create a storage volume data2 on the other ata2 disk of size 12G in the same manner.
Step 19:
 Now we have two storage volumes. data1(/mnt/data1) and data2(/mnt/data2). We will use one for unix share and one for windows share.
Step 20:
For using these volumes as shared disks, we need to create corresponding shares. Using FreeNAS we can create there type of shares. Unix, Windows and Apple.
 Now goto sharing tab(in small box). See that there is no shares defined yet.
Step 21:
 Step 22:
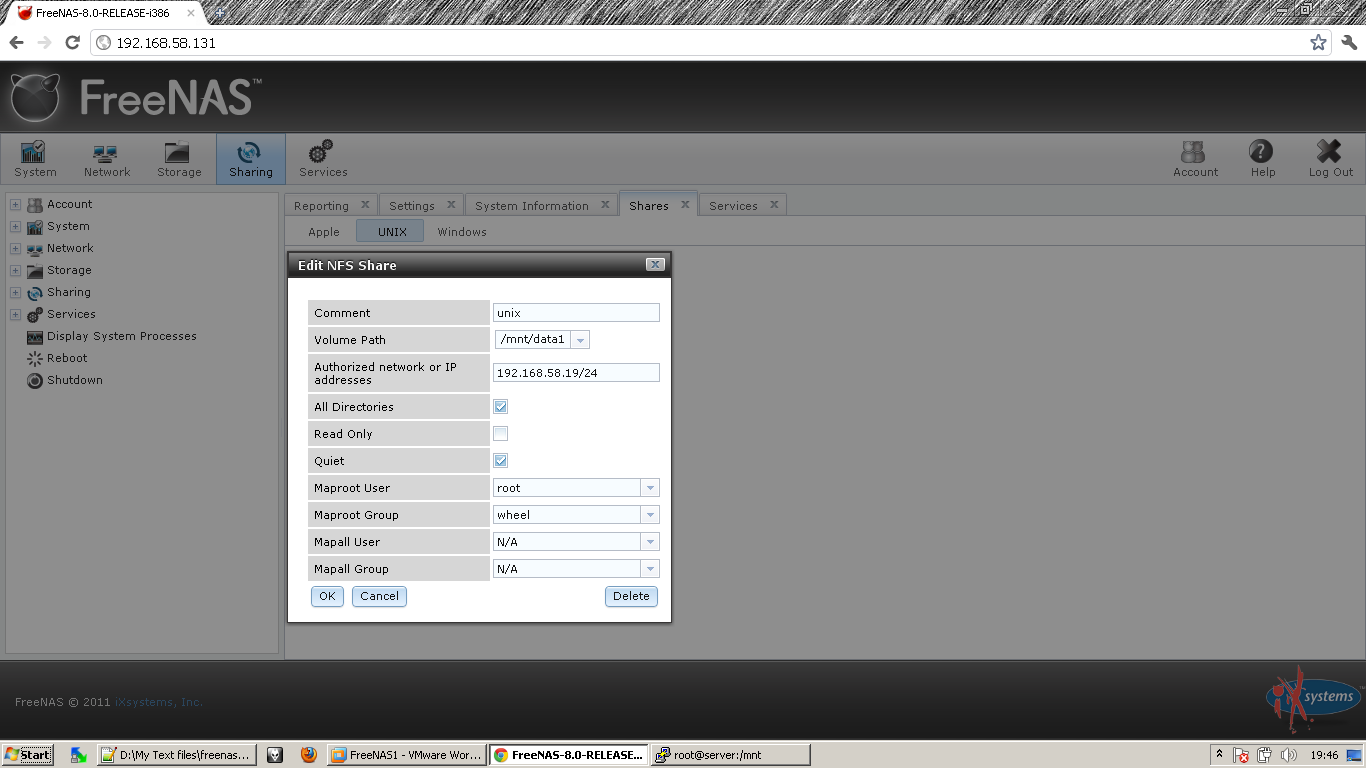
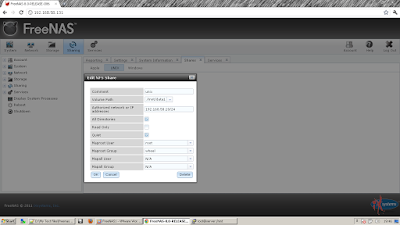 Now a new pop up window appears where you can define parameters for share. Comment you can give as unix(not imp). We are using our share data1 for linux. So select path to /mnt/data1. Give the IP/CIDR of the destination machine which the share to be mounted. And select other permissions according to your requirements. And click OK to create the share.
 The unix share is created.
FreeNAS is a FreeBSD based os used for sharing storages over the network. The version we are using is 8.0. Which is based on FreeBSD 8.0
Installation:
Normally we install FreeNAS into a usb device which has size of less than 2Gb. Because if u install FreeNAS in a partition of 10gb,all those 10gb cannot be used for anythig else. So always install FreeNAS in a usb drive or a partition of less than 2Gb.
Here for testing we will install FreeNAS in a vmware instance. The specifications are given below. You will need a dhcp server installed in your network.
FreeNAS1:
RAM - 1024M
Processor - Intel(R) Core(TM)2 Duo CPU T6400 @2.00GHz
Hard Disk (IDE) - 2gb
Hard Disk (IDE) - 10gb
Hard Disk (IDE) - 12gb
cdrom - FreeNAS-8.0-RELEASE-i386.iso
Network adaptor-1 - (bridged)
Network adaptor-2 - (Host Only)
Display - Auto detect
Aim :
We will install and configure a FreeNAS machine with following storage shares.
We have two disks.
- One of size 10Gb
- One of size 12Gb
We will create two shares
- One for unix systems
- One for windows systems
Our shares will be as follows
- /mnt/data1 type unix of size 10Gb
- /mnt/data2 type windows of size 12Gb
We will do the following tasks
- Mount /mnt/data1 to a Redhat Linux Enterprise Server 5 Machine IP 192.168.58.19
- Mount share named "data2" to Wndows 7 machine with IP 192.168.58.78
Check the permissions :
We will check read and write permissions of both shares on mounted systems.
Check the reports :
We will check the reports of memory usage, average load etc from FreeNAS web interface.
Mounts :
We will see how to mount the linux and windows shares permanantly.
Thats it. Lets start.
Step 1:
After starting the vmware FreeNAS vm, you will be prompted as follows :
Step 2:
Step 3:
Normally we install FreeNAS into a usb device which has size of less than 2Gb. Because if u install FreeNAS in a partition of 10gb,all those 10gb cannot be used for anythig else. So always install FreeNAS in a usb drive or a partition of less than 2Gb. So we will install FreeNAS in ada0 which is of size 2gb.
Step 4:
Press yes to proceed with installation.
Step 5:
Installation in progress. Unzipping data.
Step 6:
Installation completed.

Change the settings of cdrom in vm's settings from "use iso file" to "use physical drive".
Step 8:
Start the vm.
Step 9:
You will be prompted again. This time for select the boot menu.
FreeNAS is success fully booted. The IP addresses for the Web interface will be listed.
Step 11:
Access the web interface from your favorite browser.

Give the credentials
Username : admin
Password : freenas
Step 13:
When you are logged in successfully, it will show System information page.

Step 14:
Now we will create storage volumes which we will use for sharing.

Step 15:

Step16:

Step 17:

Step 18:

Step 19:

Step 20:
For using these volumes as shared disks, we need to create corresponding shares. Using FreeNAS we can create there type of shares. Unix, Windows and Apple.

Step 21:
Creating a Unix/Linux share: Go to the Linux tab on sharing section. Now there are no shares defined. Click on add UNIX share button to create one.

Step 23:

Step 24:
Creating a windows share.

Step 25:

Step 26:
Now you can see that the windows share is created.

Step 27:
Now, we have created both the Unix and Windows shares. For accessing these shares from unix and windows machines we need to start two services. Unix/Linux shares are mounted using NFS service and Windows shares using CIFS. We need to start these services.

Step 28:
Setting Default Gateway: If you have a dhcp server in your service all your Ip's, gateway, nameservrs will be set automatically. I strongly recomments using dhcp server. Else it is complex for newbies.

Chaning the permissions of storage device. Goto "storage" page and in "active volumes" tab the volumes will be listed. You can change the permissions as required.

Step 30:
Now all the volumes and shares are created and defined. Now we need to mount the shares to corresponding destination system.
Mounting the Unix share. We are mounting unix share /mnt/data1 to destination system 192.168.58.19.
Login to 192.168.58.19 and execute the following command.
Execute the following command to mount.
[root@server ~]# mount 192.168.58.131:/mnt/data1 /mnt
Check whether the share is mounted or not
[root@server ~]# mount
/dev/sda2 on / type ext3 (rw)
proc on /proc type proc (rw)
sysfs on /sys type sysfs (rw)
devpts on /dev/pts type devpts (rw,gid=5,mode=620)
/dev/sda1 on /boot type ext3 (rw)
tmpfs on /dev/shm type tmpfs (rw)
/dev/hdc on /media type iso9660 (ro)
none on /proc/sys/fs/binfmt_misc type binfmt_misc (rw)
sunrpc on /var/lib/nfs/rpc_pipefs type rpc_pipefs (rw)
192.168.58.131:/mnt/data1 on /mnt type nfs (rw,addr=192.168.58.131)
So it is mounted.
Now we will go inside the directory and check the read and write permissions.
[root@server ~]# cd /mnt/
Creating a file (write):
[root@server mnt]# touch test_writing_permission
Listing files (read):
[root@server mnt]# ls
test_writing_permission
Writing data to the file (write):
[root@server mnt]# dd if=/dev/zero of=test_writing_permission bs=1024 count=100000
100000+0 records in
100000+0 records out
102400000 bytes (102 MB) copied, 17.4445 seconds, 5.9 MB/s
Checking the size:
[root@server mnt]# du -h test_writing_permission
98M test_writing_permission
[root@server mnt]#
Everything is fine. All the permissions are working.

Step 31:
Mounting the Windows share "data2" to 192.168.58.78.
Searching the windows shares in FreeNAS system from Windows destination system.

Windows share is listed.

Mounting the windows share permanently

Step 34:

Step 35:
Now the share is mounted perfectly.

Step 36:
Testing write permissions by creating a folder.

Step 37:
Testing permissions by creating a file.

Step 38:
Checking the reports :
Report1 : CPU usage, Physical Memory Usage, System load and Swap utilization

Report2: Processes, Disk space (data1) and Disk space (data 2)

Changing the Timezone

Setting nameservers. Use dhcp instead.

Thanks ,
Source : - helpinlinux.blogspot.com